I have a stern dislike for mistruths, and there appears to be some about me, my company and one of it’s products, I feel the need to set the record straight.
In 1997, I had a customer purchase a 1985 Honda GL1200 LTD. He had done a great deal of research on the Internet in regards to the bike and it’s potential problem areas. Of course, the stator was #1 on the list. We emailed each other several times in regards to the bike, his wishes, and we set an appointment. Among other things, he brought me a stator harness that was marketed thru Saber Cycle that had been designed by Campbells Electronics. As I understood, a company called Ray’s Small Engines had bought the rights to from Campbells to build the harness. It appears that Campbells is again building and marketing the harness as of Feb 2005.
The harness I was presented with had Xeroxed instructions that bordered on unreadable. Here are the problems I found with the unit:
1. The harness itself was very poorly built.
2. The gauge of wire on several legs was too small.
3. There were redundant connections.
4. The coils were being powered constantly, even with the key off.
5. Power for the coil wires was not fuse protected.
6. The harness used all low quality solder less connectors that were not crimped using the proper tool.
I did not understand some of the design of the harness. I called Ray’s Small Engines and got very vague, short answers. I asked if there was a way for me to contact Mr. Campbell and I was told no. At this point, I set out to redesign the unit to:
1. Use the proper wire gauge for the load (usually one gauge higher than needed).
2. Have soldered connections at all high load connection points.
3. Remove power from the coils when the ignition was off.
4. Apply fused protection where the other lacked it.
Our design worked very well in testing. It accomplished all the things that us and our customer had hoped for. And at the time, was a lot less money than the Saber Cycle product.
Did we design the harness? No. We redesigned it. Never have the words come out of my mouth or anyone at my shop (that I am aware of) that we designed the unit.
So what about the statements Campbells makes in regards to our product? Since I do not have permission to reproduce exactly from their page, I will get as close as I can without infringement:
You will pay too much.
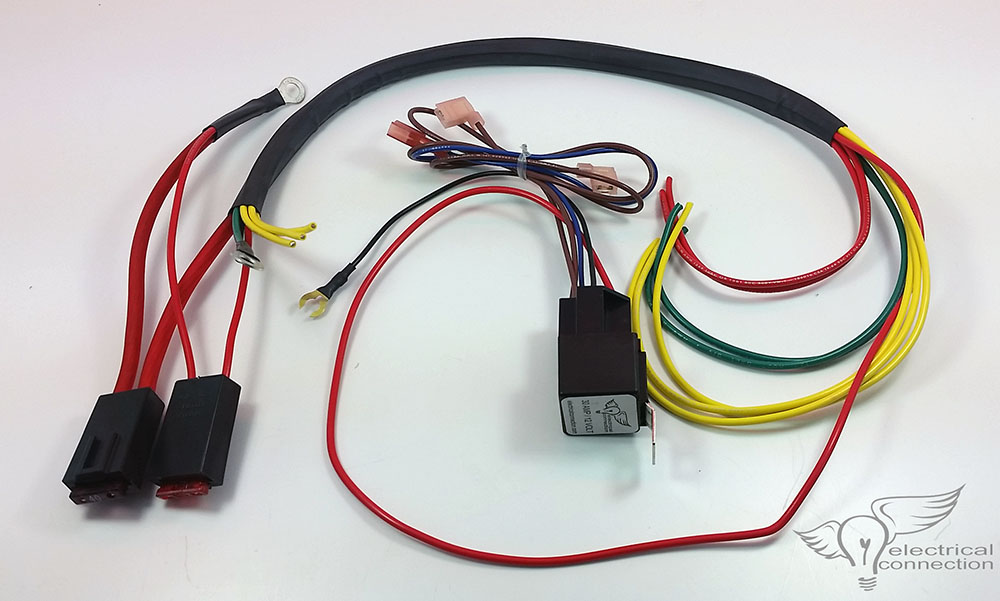
Our harness uses American made wire, is silicone sleeved, includes an integrated relay for coil power switching and is hand soldered on all high current connections for maximum current flow with fuse protection.
You will get a copy of their first harness design that uses fuse holders that are not sealed so water can get in and ruin them.
While our fuse holders do not have covers, they are an OEM product that allow us to seamlessly integrate the fuses into the wire without additional connection points. Also, our main power wire to the regulator is a very high strand count 10 gauge wire (high strand flows current better). There is not a waterproof fuse holder with this level of quality wire in 10 gauge that I have found. And unless you have the side cover off when you are washing or riding the bike, water has a difficult time making over the side cover, up and under the seat and into the small gap left by the fuse in the fuse holder. We have recently started to include dielectric grease to fill the small gap left between the fuse and fuse holder so this is a moot point.
You will get a harness that has an ignition relay that will fail from vibration.
Our relay is an OEM quality product found in automobiles everywhere. And it is not an ignition relay specifically; it is a Universal design that is the most popular format on the planet. Easily replaced anywhere in the world if necessary. This unit is rated at more than 5 times the load and switches off power to the coils so that they are not constantly powered. If a relay was subject to damage from vibration, why would virtually every vehicle on the planet use relays?
They released a few of this early version to let ‘us’ steal and copy it, while they went on and quietly improved the design.
According to their website, they invented the harness about 1992. We redesigned the harness in 1997. You do the math.
You will get poorly crimped connectors to fail. Crimp connectors are the problem. They are why your Gold Wing is having problems now.
We use the “Super Crimper” brand hand crimpers from Hitachi that are an OEM Honda dealer tool. There is no better hand crimper available anywhere for the application. All of the high current flow connections are crimped and soldered. The problem was indeed the connectors, but not necessarily the crimps. The connections were flowing more current than they could handle. This is why 1200’s would melt and discolor the 3 pin connector from the stator. Too much current = heat. Every wire on your motorcycle terminates into a crimp of some sort; ring terminal, battery connector, mini pin that is inserted into a multi-pin connector. If crimps were truly such an issue, Honda and every other OEM would have stopped using them years ago.
You will get an inferior and mass produced item.
The only other person that has built this harness other than myself is someone I personally trained and has been building them for the last 6 years. We build 15 to 20 at a time by hand in our Knoxville shop.
No technical support available.
Unless you call when I am out of the office, I can walk anyone thru the install and troubleshoot installation issues. I can’t help you with the fuel injection though.
So what’s my background? GWRRA member since 1983, #28340. Check out this photo: https://www.electricalconnection.com/family.JPG That’s me in the red shirt next to my first Gold Wing in 1984 heading to the GWRRA CA State Rally in Fresno. I was 18 years old and a senior in High School. My first bike was a 1983 Honda Silver Wing. I started wrenching on Wings in 1982. I worked for my father at a motorcycle touring shop in Laguna Hills, CA called “Custom Touring Design.” This place was responsible for a large portion of the product offerings from Markland Industries during this era. The shop was able to integrate the Honda CB into the radio for the first Yamaha Venture as Yamaha did not have a CB available. The install was so clean and worked so well, Yamaha sent a bike to the shop to have a radio installed and based their product off our design. Did I design the conversion? No, but was taught by the person that did. We had some of the most talented Gold Wing techs anywhere in the US. When the dealer could not repair a Wing, we ended up with the bike. The shop developed powered center stands, shifters, and numerous other items that were not currently available at that time. We were also a testing facility for all the major tire manufacturers.
Except for a few years that I served with the US Army as an Air Traffic Controller, my whole life has revolved around motorcycles and most specifically Honda’s Gold Wing. I have Service Manuals and ETM’s for every Wing since 1982. While I may not have everything about the Gold Wing’s electrical system committed to memory, we know how to decipher the factory ETM to determine fix for any problem that is not from one of the bike’s computers.
Lewis Q. Preston, Proprietor
Feb. 27, 2005
